Friday, December 30, 2011

Christmas in the Country

I love spending Christmas with my family at our cottage north of Montreal. The drive there is always beautiful, I couldn't wait to get there.

The beautiful country roads on my drive.

Our picturesque old schoolhouse church.

Since there is no heat or electricity inside, we all wear our finest winter wear as we sing Christmas songs.

We found a beautiful pine tree from the forest around the cottage, it makes the whole house smell great. With ten of us spending Christmas together, there are bound to be lots of gifts under the tree!

We decorate the tree with our handmade decorations from our childhood.

I found this vintage sled at my local thrift shop and couldn't wait to have my friend's three kids to enjoy it.

The view from our front window. We love watching the deer eat out of the feeder at night.

If we don't see the deer, at least we can tell that they've visited...

The cottage is a French-Canadian style that is covered in barn wood.

Our wood shed although functional looks beautiful in photographs.

The frozen lake is so peaceful and quiet to walk on.

I am grateful to have a beautiful place to spend holidays and such an amazing family to spend them with.

I hope everyone had a wonderful Christmas too and will have a Happy New Year!

Thursday, December 22, 2011

Happy Holidays!


I found these blocks spelling out the word NOEL at my local thrift store. At 50 cents a piece they were a bargain but certainly looked like they were only worth that much!


The blocks were made of plaster and were painted gold in some areas and left unpainted in others. I knew they would look fantastic if they were given an aged look and I did so using a crackle paint technique.

Now they are ready for a beautiful Christmas table setting...Happy Holidays!!

Thursday, December 15, 2011

Great Gifts!


Christmas is approaching fast...visit my store for some last minute gift ideas and take advantage of the sale prices!

VISIT STORE

Friday, December 9, 2011

Lovely Lantern

I found this lantern at an outdoor flea market this past fall. It had been exposed to the elements and developed a beautiful patina and rust. It had old wires running through it and was intended as an outdoor light.

Instead of re-wiring this lantern, I decided to use it at a beautiful Christmas decoration. I removed the top part that would attach to a ceiling and added a chain to hang it. All of the original glass was there but I didn't use it all. I kept the glass on the underside in place to hold in the candle, but I left out the glass on the sides. With the lantern now open, the candle is really featured and we can appreciate more of the rust and patina on the inside. A red satin bow and a branch of berries finish off this holiday look.

Even though we don't have snow in Montreal yet, this lantern is really putting me in the Christmas spirit!

Friday, December 2, 2011

Story of Stuff


I came across this amazing short documentary a few years ago and it really changed me. At the time I was working as a product designer in the home decorating industry. I was contributing to the chain of stuff and didn't even know it. The products I was designing were only meant to last a short while and then be thrown out, either because they were such poor quality or because they were no longer in style. These products were being produced and shipped from the other side of the world so that we in North America could enjoy them at a low cost.

But where does all that "stuff" go when the next trend comes along and all the new "stuff" is brought in to replace the old? We aren't encouraged to think about this because if we did, guilt and conscience would certainly put a stick into the spokes of the cycle of consumerism.

When I started my company, I wanted to approach decorating more conscientiously and "the story of stuff" was never far from my mind. I didn't want to go into a home and have my clients get rid of everything only to replace it with the newest trend. I believe that displaying family heirlooms gives a home such character and it tells a story about our lives. When a client has dated or well worn furniture and objects, I often refurbish and update them. I do my best to keep newly purchased items on my decorating projects to a minimum. Garage sales, vintage stores and the internet are where I find so many unique and quality pieces to decorate with which keeps pre-loved items circulating locally and out of landfills.

We've been convinced for too long that we need to buy the next biggest and best thing to keep up with our neighbors and appear that we've "made it" but this kind of consumerism has come at a high price to humankind and the earth.

Check out this amazing thought provoking documentary  www.storyofstuff.com

Thursday, November 24, 2011

Patchwork Pillow

When I shop in thrift stores, I keep my eye out for furniture and decorative objects but another thing I love to hunt for is fabrics. There are always interesting finds like sheets, tablecloths, curtains etc. Sometimes there are even leftovers from fabric stores.

There are so many beautiful pillows all over decorating stores and websites these days and I wanted to try my hand at creating one. A gray and teal color combination was what I decided on, and I wanted to use different weights and types of fabrics. I bought a 16" x 16" pillow form at a craft store but you can also use stuffing and create whatever size you want. The middle panel was created first by sewing the right sides of several fabrics together.

I made two crumpled satin pieces of fabric by cutting them twice as long as the others, doing a loose hand stitch, pulling on the thread to crumple it then sewing it to another piece as usual. I saved my favorite fabric, the gray wool blend for the largest area which gives it a cozy feeling.

Now these orphaned fabrics have been given a new life!

Thursday, November 10, 2011

Favorite Things: Marvelous Medallions

I love the idea of hanging medallions on a wall. I found these ones in a few different places, the two small mirrored ones at a thrift store and the three middle ones discounted at a decorating store because they were a little damaged. They were all different colors but once I painted them the same acid pear tone they looked perfect together.

Thursday, November 3, 2011

Beautiful Bench

I bought this little bench at a flea market this past summer. It was plain and boring and I wanted to change it up a little.


The seat had been originally covered in a strange vinyl and it had to go. Last time I visited my parent's place, I dug through my mom's sewing dresser and found some great vintage fabric that I used to cover the seat. Brown was the best choice to match my fabric and at the same keeps it neutral. I found the legs were a bit long and plain so I built a shelf for shoes to sit on.

I thought it would be fun to give the bench a little extra storage for hats and gloves, so I closed off the underside, and put hinges on the seat for it to open.

Now this simple bench has built-in storage and a lot more style!

Wednesday, October 26, 2011

Sunny Stairwell

When my clients bought their second floor condo, they really loved it inside...but the stairwell leading up to it left a lot to be desired. It was dark and didn't have a lot of natural light except for the window in the door to the outside at the bottom of the stairs.

The previous owner had decided to paint the stairwell a dark color on the stairs, doors and all the trim. Aside from my dislike of the dated blue and yellow combination, it was just too dark a color for the space. Short of putting in a skylight (a few thousand dollars but well worth the cost if your budget allows for it), the only other way to light up this space was with paint. I knew that using white would make a big difference and I kept the walls a soft beige to add some color without losing any light. The floor and stairs would be left a dark color for traffic and wear but this time I chose dark brown.

What a difference a coat of paint can make!

Thursday, October 20, 2011

Terrific Table

I've had this kitchen table for many years. I bought it second-hand when I was moving in to my first apartment. It has always been painted but I was told when I bought it that it was teak.
I knew that whatever work that went in to restore this table would be worth it.

I started out by stripping the paint off the table and found the beautiful teak wood underneath. When I started stripping the chairs, I realized that this certainly wasn't a set. The chairs were made of a different wood and had been painted black stain that wasn't coming off. The chairs were going to have to stay painted but I didn't mind, I've always liked this look where a table and chairs don't match. I chose a lighter color of blue this time for a fresher look and to have more contrast with my darker teak table.

Wednesday, October 12, 2011

Favorite Things: Glorious Gourds

This time of year, I love to walk around Atwater Market and pick up some gourds to decorate with. I found this woven basket at a garage sale a little while ago and it looks beautiful filled up with all the colors of fall.

Friday, October 7, 2011

Mini Makeover

This week I wanted to show my own bathroom makeover. My apartment was built in 1907 and my bathroom is as small as they come. I'm fortunate to have the original cast iron tub but it takes up most of the space and believe it or not there is no room for a sink! That's right, there's only a tub and toilet.

Since this was such a small space, I knew only something custom-built would maximize what little area I had to use.

The first thing I did was remove the little corner shelf and the medicine cabinet both of which haven't been that useful.

I still had some leftover wood from the pallets I had found a little while back (check out my previous blog post "Great Garbage") and I wanted to use it in my bathroom to give it a rustic look.

Thrift stores are always somewhere I check first when doing a decorating project and amazingly they had a larger medicine cabinet with a beautiful mirror! Since I was building my own cabinet, I only needed the mirror part and the piano hinge it came with. I based my dimensions on this new mirror and luckily the pallet wood didn't even need to be cut on the top or bottom, it was already the right length and depth. I only had to cut 4 small pieces to make the small shelves on either side of the mirror.

My mom had some beautiful vintage blue floral fabric that was exactly what I was looking for to make a curtain. I decided to paint the walls and ceiling a soft blue to keep the open and airy feeling. Another vintage piece I added was a metal garbage can in the corner.

The bathtub was another thing I painted to add some color to the space and I used a teal enamel paint I had leftover from a previous project.

I used a longer piece of pallet wood for the side wall to hang some bath accessories.  I bought some beautiful porcelain knobs at my local Habitat for Humanity Restore (another place I always check for supplies before heading to a big box store).

My last item to tackle for this bathroom makeover was to figure out what to do for a toilet paper holder. I didn't want something that would stand out too much so I built my own.

I never thought I'd say this....but I really love the toilet paper holder I made!

Wednesday, September 28, 2011

Magnificent Macrame

When I saw this pot at a thrift store I fell in love with it.  It was handmade and the three holes in the top told me it had been made to hang a plant.

Macrame has been making a resurgence lately, both in fashion and in decorating. I have seen many beautiful plant hangers and wanted to make my own.

Instead of using the typical polyester string, I wanted to use something more natural like jute and add wood beads. I found some great how-to videos on you-tube about macrame and went to work.

I used a two inch metal ring at the top and three long strings of jute that when folded in half become six. After tying a few knots, I threaded the beads on. The knots have to be tied at the same height on each string in order for the plant to be level in the end. After calculating the height I wanted the plant to hang, I tied the knots to attach the pot. To criss-cross the string over the pot, the strings next to each other have to be tied together. When it came time to finish off the bottom, I tied a knot and instead of leaving just strings hanging I tied more beads on staggering their lengths.

Thursday, September 22, 2011

Realistic Rendering

This week I wanted to show a before and after that isn't!
For this kitchen makeover, my client was having trouble visualizing her kitchen any other way than it was.

Using the photo that I took of the kitchen, I created a digital rendering in photoshop. This way I was able to show my client the concept I had in mind and how the kitchen would look once renovated. She couldn't wait to get started and transform her drab kitchen.
Stay tuned for this makeover!

Wednesday, September 14, 2011

Art as atmosphere

Ambaa Yoga studio, where I have been practicing for the past 5 years, has decided to have a changing art wall featuring new artists every semester. I have the honor of displaying my art this fall semester.


Since I had the whole wall to work with, I decided to make one large collage painting that is split up into 10 canvases. I chose to use a muted color pallet of whites, blues and soft beiges that I felt would create a healing atmosphere.

I will have a vernissage this Friday night from 6:30-9:30 at Ambaa featuring this new painting and a few other paintings and prints. This will be a nice way to end their Open House week and a great chance to meet the teachers and me!
www.ambaayoga.com

Wednesday, September 7, 2011

Creative Confessions

This week, I decided to make my before and after a digital transformation instead of a decorative one.

I had a friend of mine take my photo for my website, we didn't use any type of studio lighting because I wanted it to look natural. Instead, I sat by the window and used the soft natural light. Out of all the photos we took, I liked the pose in this one but I knew I had some work to do. 

Even though I now work as a decorator, I worked in the graphic design industry for over 12 years. For over 2 of those years, I was a digital photo re-toucher for a toy company. I worked mostly on product photos for catalog and packaging purposes but every now and then we did a photo shoot with children. There was always re-touching to do, especially on kids who were fair skinned like myself. We tend to look a little transparent/blueish and blotchy. Heavy foundation make-up may have helped but that wasn't an option. Here's how the digital transformation went.


When I re-touch a photo, my goal is that it doesn't look re-touched in the end, but natural.

Even tough my hair is an even color of blond, the lighting the original photo made it look like I had darker roots out to lighter ends. By lightening the top, my hair now looks even. This photo was taken in my studio and the background looked cluttered so I darkened it to make it fade out.  For my face, I began with evening my skin tone, by using what in the end looks like digital face powder. This made my face less red and blotchy and took away the circles under my eyes. Once my skin tone was more even I added a bit of digital blush. I noticed that the eyelashes on the left side weren't even like the other side so I cloned them to make them even. The eyebrow on the right side was thicker than on the left so I thinned it out. It's amazing sometimes how much work can go into making something look "natural"!

There has been so much in the media about unrealistic expectations that magazines and ads set with highly photoshopped faces and bodies that end up looking nothing like the person in the end. I hope I've shown an image that was taken from looking a little raw to something more flattering without compromising my integrity in the end.

Thursday, September 1, 2011

Let there be light!

I've had these 2 metal rings and hanging light cord for a while now waiting to be transformed into a beautiful hanging lampshade.

I wanted to make a lampshade that was transparent in some areas and more opaque in others. To create the shade itself, I used a heavy clear plastic that I cut to 10" high and the length of the circumference of the 18" metal rings. Using Mod Podge, I glued on different types of paper and painted other areas. I made many holes about 1/8" from the edge of the top and bottom of the plastic and with a large needle and hemp string I attached it to the metal rings. Even though I really loved how the lampshade turned out, it was only when I put the light inside that it really came to life.

Wednesday, August 24, 2011

Favorite Things: Wonderful Wildflowers

I decided to showcase some of my favorite wildflowers this week. I picked these while on my way back to the city from my cottage this past weekend. Since these flowers are so delicate, I love to display them in antique medicine bottles that I have, believe it or not, these photos are close to actual size!

Wednesday, August 17, 2011

Great Garbage!


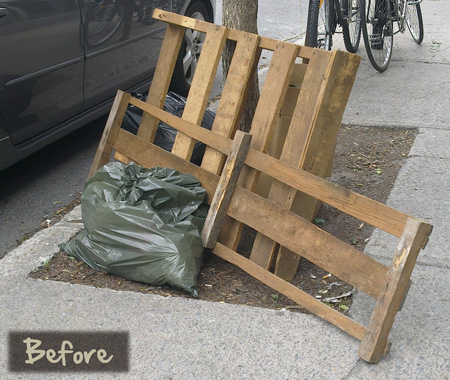
I found these pallets in the garbage one day while I was walking around one of my favorite areas of Montreal. Luckily I had driven that day so I was able to throw them in the back of my car. I love the look of weathered wood and I couldn't wait to build something out of them!

Disassembling these pallets proved challenging since they were full of rusty nails but once I got them apart I was able to get started.  I cut down one of the longer pieces of wood to 36". By adding some antiqued black hooks it now makes a stylish coat rack!
 
I still have wood leftover so stay tuned for more projects!